Guest Post by Ben Mulholland, Process Street
When you have a lot of new sign-ups, you have to treat them carefully. They need attention, but the right kind of attention. They’re like small children in that regard.
And similar to small children, new sign-ups don’t just stop needing attention. Good parents will maintain good relationships with their children, well into adulthood. You don’t simply cut off a healthy relationship like that.
Escaping the analogy for a moment, maintaining a good onboarding process is much the same; it never really stops.
The benefits of onboarding are clear. It’s the best place to obliterate the seeds of churn and place the foundation for a long-lasting relationship with your customer.
As John Jantsch says, “If you hold a customer’s hand for 90 days, they’ll be loyal for life”.
Of course, your approach to onboarding will always be different on some level – that’s very much the challenge of onboarding – but a few key elements will always remain the same.
Fundamentally, good onboarding is about building and maintaining a relationship with your customer. You do this by observing them, and using every means necessary to understand their needs, and then delivering them value tailored to that insight.
Send your new clients the welcome they deserve
The onboarding process is a time-sensitive endeavor. Despite the truth of onboarding being an ongoing process, the first movements of onboarding are the most important. It’s about making a good first impression.
Statistics speak for themselves: 22% of customer turnover happens within the first 45 days of onboarding! The importance of a first impression is crystal clear.
There’s also a lot of tedious manual work that goes into an onboarding process, like sending over contracts, scheduling calls, collecting and requesting documents; it’s a very time-consuming process, and can be painful for both you and your new clients.
That’s why you should be automating as much as possible.
When time is so sensitive, every moment counts. And the more you can automate, the more time you’ll have left over to devote to what really matters: providing your new clients with value, based on their needs and desires.
Make an impression with highly personalized marketing campaigns
Your clients love to feel special. Personalized content that isn’t just simple boring template emails is a great way to make a good first impression.
By serving your clients customized handwritten cards, postcards, and all kinds of welcome notes as part of your onboarding process, you’ll be sure to surprise, delight, and impress them with your attention to detail and set your brand apart from the mess of noise that typically clutters onboarding packages.
How to use Thankster and Process Street to improve CLV
A great way to make sure you’re giving new customers the care and attention they deserve is by making sure you’ve got a solid onboarding process; and the more you can optimize and automate that process to eliminate manual tasks and tedious inconveniences for both you and your customer, the better.
Introducing Process Street; a piece of bpm software that helps you to quickly and effortlessly build and organize workflows.
Together with Thankster, Process Street can help you automate the client onboarding process with the power of integration.
Integrations are basically when two separate tools “talk to” one another and make your life easier by reducing the amount of manual work you have to do.
Quick-and-dirty introduction to Zapier (and integration)
So, what exactly is Zapier?
Basically, it’s a tool for linking software together, making it easy for them to “talk to” one another and work in order to be more useful to you.
It does this with “Zaps”, which is basically Zapier’s name for an integration.
To do this, it uses API keys: these are just bits of information associated with the software you use that allows them to securely communicate.
You don’t need to understand what they are; just where to find them. Thankfully, that’s very easy.
Components of a Zap in Zapier
Zaps are made of two parts: triggers and actions.
Triggers are basically events that cause Zapier to think “Oh! I need to do something now”, and actions are what happens as a result of those triggers.
We want to set the Zap’s trigger to go off whenever a new task is checked in Process Street. Then, the action will be that a customized card sent out to the new client as part of an onboarding welcome package.
And that’s pretty much all there is to know about integrations, and Zapier, for this example.
Now, the first step is to create a new Zap.
Head on over to Zapier and create an account if you haven’t already.
Then, click the “Make a Zap!” button on the top right corner of the screen:

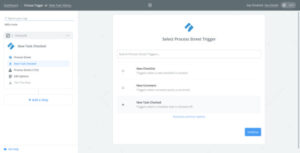
Setting up Process Street as a trigger in Zapier
Once we’ve started building the Zap, the first thing we want to do is to set up the trigger. Search for “Process Street” in the search box, and select “New Task Checked” as the trigger, like this:

Now, select the organization you want to use inside Process Street.
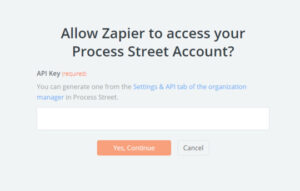
For first-time users, now is the time to grab your API key, which can be found in the “Settings & API” tab of the organization you wish to add.
Click the “New API Key” button and copy the code into your clipboard.
Then jump back into Zapier and click “Connect An Account”. Pop in the API key you just created, and you’re good to go.
Now you’ll need to set up a Process Street template so that we can test out this Zap is working.
You can quickly make your own by creating a new template, or you can grab a pre-made one, like this checklist for client onboarding at a marketing agency:
<iframe src=“https://www.process.st/checklist/client-onboarding-for-a-marketing-agency/” width=“100%” height=“600” frameborder=“0”></iframe>
Whether you grab that checklist for yourself from the link above or create a similar one for yourself, the next step is to input the necessary fields into the setup page and click the “Continue” button at the bottom.
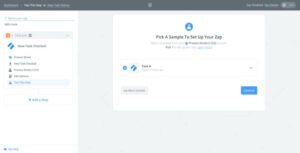
One final step for setting up this trigger: pulling in some samples from the Process Street checklist. Your current situation should look something like this:

All you have to do is run the checklist you just associated with the Zap up to the task you specified as the trigger: basically “trigger” the Zap, to make sure it’s working so far.
So, go ahead and run the checklist in Process Street until you complete the trigger task, and you’ll be greeted with a notice like this:
Click “Continue”.
We’re all wrapped up with the trigger, and now it’s time to set up the action.
Setting up Thankster as an action
Firstly, click “Add a Step” and select “Action/Search”.
Search for “Thankster” and make sure the action is set to “Send Cards”, like so:

Now, connect your Thankster account.
You’ll be faced with this window:
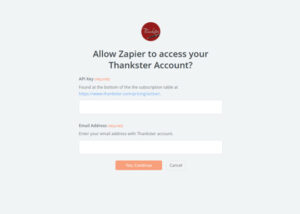
As stated above, head on over to Thankster to grab your API key, and fill in the fields.
Once your account is connected, it’s time to set up the template for specifying sending instructions.
Configure your Thankster settings and click “Continue”.
Then, you’ll need to test the integration.
Testing the integration
On the “Test this Step” tab, scroll to the bottom of the page and hit “Send Test to Thankster”.
And that’s it! You’re finished with setting up this Thankster integration.
Don’t forget to name your Zap, and turn it from “OFF” to “ON”.